AntzMix Studio – Help
AntzMix is a live video mixer that runs in your browser. Switch between cameras, videos, pictures and Bible verses, put logos and name titles on top, and send the result to a big screen, Zoom/Teams or a live stream.
What's new in rev61
Full details of the latest update. Older updates are summarised in the Change log.
A new home: wemix.antzsolutions.com
- AntzMix Studio now lives at https://wemix.antzsolutions.com/. Please use this address from now on and update your bookmark.
- Your browser keeps settings per address, so on the new address you start fresh: keyboard shortcuts, theme, Snapshot folder and the Recent list of templates. Your template files (.antzmix) open as before.
- AntzMix Service Relay 1.21: works with the new address, and takes its updates and add-ons from it. Update: right-click the relay icon → Check for updates (or download it again).
After this update, press Ctrl+F5 once so the browser loads the new files.
Getting started
- Open AntzMix in Chrome or Edge. The start-up window shows what's new and how far loading is. When it is ready, open a template or click Start new (empty) – that click also lets the browser start sound.
- When you start new, AntzMix shows two starter inputs – colour bars and a blue colour – marked ADD INPUT TO START. Their only buttons are Close and Add Input. Click the gold ADD INPUT ▾ (top left, or on a starter tile) and add what you need: a camera, a logo, a video, a Quick Prompt. Added from a starter tile, the new input takes that tile's place; the other starter stays until you close it. Added from the top button, nothing is removed.
- Click the picture of an input – it appears in Preview (blue bar marked PREVIEW, left). Preview is what goes on air next.
- Press Cut or Fade – Preview moves to Program (red bar marked ● LIVE PROGRAM, right). Program is what your audience sees.
- Put a logo or name title on top with the 1 2 3 4 overlay buttons.
- Send Program out: Fullscreen output for a projector/TV, Zoom/Teams screen-share, or ● Stream to YouTube/Facebook.
The screen at a glance
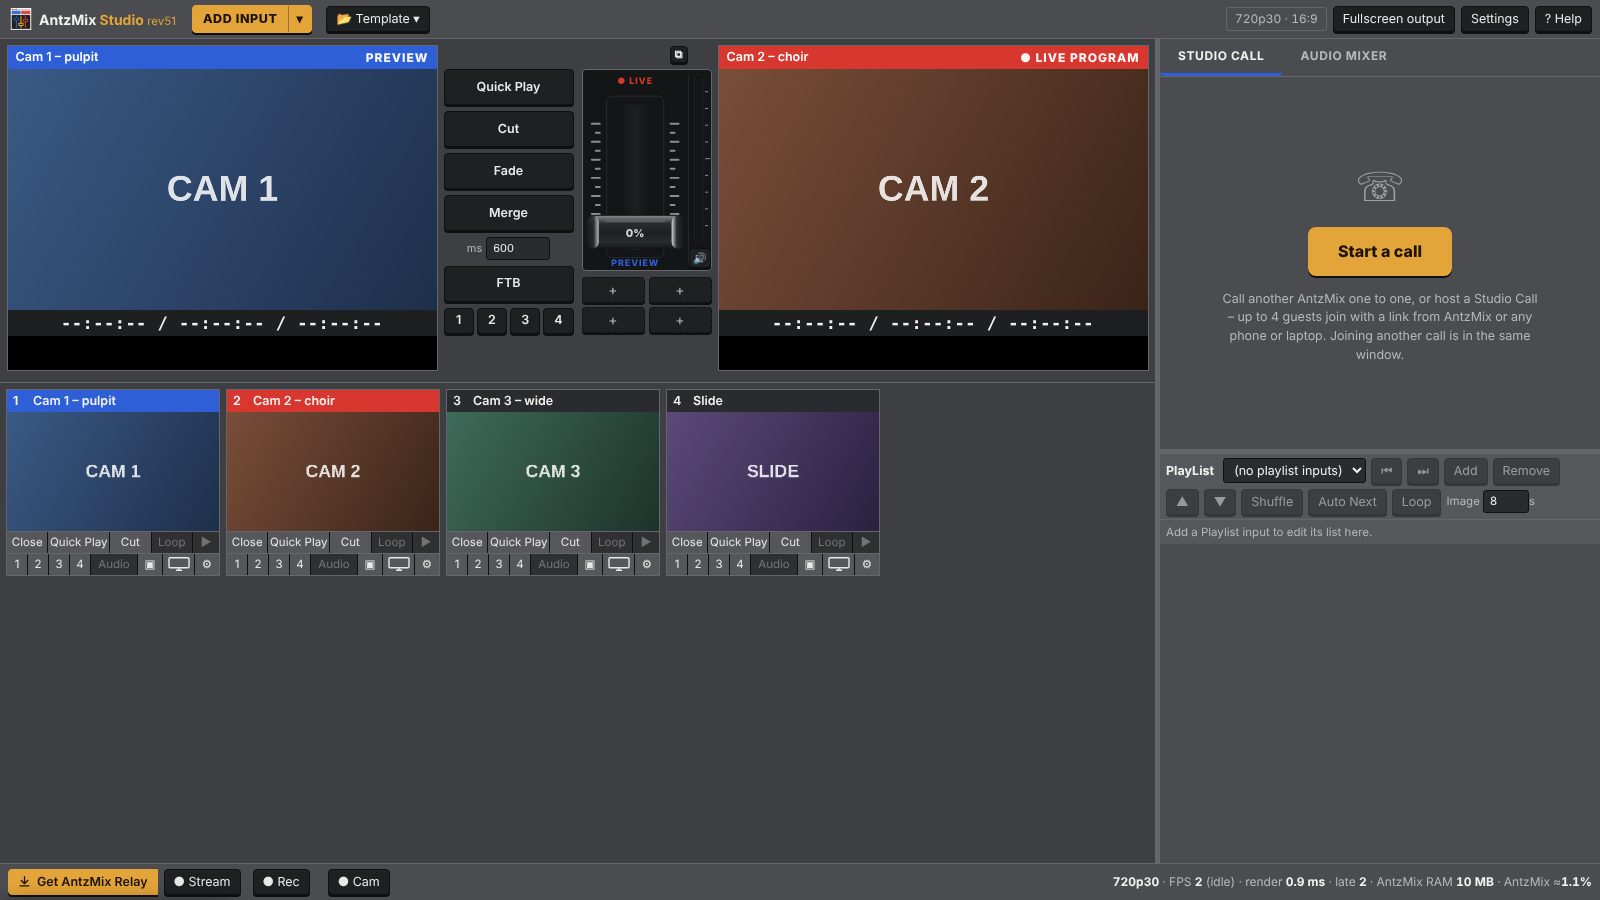
- 1ADD INPUT – cameras, videos, playlists, pictures, titles
- 2Preview (blue) – what goes on air next
- 3Quick Play, Cut, Fade, FTB and overlay layers 1–4
- 4Program (red, ● LIVE PROGRAM) – what the audience sees
- 5Input tiles – one per source, with its own buttons
- 6PlayList – edit the selected playlist (bottom of the side panel)
- 7Side panel tabs: STUDIO CALL (start or run a call) and AUDIO MIXER (volume and on/off per input)
- 8Footer – AntzMix Relay status / Start button, ● Stream, ● Rec, ● Cam
- 9Status – format, frames per second, CPU usage (AntzMix / browser / relay / other)
- 10Output format badge, Fullscreen output, Settings
PlayList button (bottom bar, left): Off hides the PlayList and STUDIO CALL / AUDIO MIXER expand downward; On brings it back. AntzMix remembers it on this computer.
Side panel (right, from top to bottom): the tabs STUDIO CALL and AUDIO MIXER above, the PlayList below. With no call, the STUDIO CALL tab shows one Start a call button; during a call it shows the guests (a green dot on the tab). Drag the thin bar above the input tiles to make the monitors bigger or smaller, the left edge of the side panel to make it wider, and the bar between the tabs and the PlayList to share the height. AntzMix remembers your layout.
Themes: Settings → GENERAL → THEME – Console Graphite (default), Console Night (almost black, for dark rooms), Console Keys (light keys), Linen (light and warm, for bright rooms) and Active (the look up to rev50). It changes at once and is remembered on this PC; your shows look the same in every theme.
Adding inputs
An input is any source you can show: a camera, a video, a picture, a title. Click the gold ADD INPUT ▾ and choose the type. Each input gets a numbered tile at the bottom.
The menu has two parts:
- STANDARD INPUTS work right away in the browser. Nothing to install.
- Notice (red, under ADVANCED INPUTS): advanced features may not work properly, or may be blocked by Windows, until our digital signature (code signing) is complete. If you want to use the unsigned version, please unblock our installer before you run it. The standard inputs work as usual.
- ADVANCED INPUTS (marked ⚡) need AntzMix Service Relay, a free helper program for Windows. They are always clickable: if the relay is not installed, not running, too old or missing a part, a window tells you exactly what to do. When it is ready, the input you clicked opens by itself.
| Part | Group | Inputs |
|---|---|---|
| Standard | Cameras | Every camera and capture card on this PC, listed by name – click one to add it (the names appear after the browser was allowed to use the camera once). |
| Phone | Phone camera (QR code). | |
| Online | Studio Call – call another AntzMix, or guests with a link. | |
| Audio only | Audio file (MP3, WAV…), Audio input device (microphone, mixer). | |
| Contents | Playlist, Video file, Image, Screen / Window capture. | |
| Texts (prompts) | Quick Prompt, Digital Bible (MCGI tier). | |
| Creative inputs | Basic lower third, GT Titles, Colour, FrameSets. | |
| Advanced ⚡ | Local network | NDI® sources (vMix, OBS, NDI cameras…). |
| Online | Zoom call / meeting, RTMP / SRT stream source, Website URL (a real, interactive browser). | |
| Contents | PowerPoint – coming soon. |
Items marked soon are being built and stay grey. The menu fills each column down to about two thirds of the screen, then starts a new column, so it never hides the input tiles more than needed.
Camera
Choose the camera and (optionally) its microphone, and the resolution. 1280×720 is lighter on the computer; 1920×1080 gives more detail. The first time, the browser asks permission to use the camera – click Allow.
Video file
Plays one video file (MP4 works best). It never starts by itself: press ▶ on the tile or under the monitor, or use Quick Play. Turn on Loop to repeat it.
Play options of one video, playlist or website (⚙ → PLAY OPTIONS)
Settings → GENERAL decides for all inputs whether a video automatically plays, gets its sound on (Automix audio), restarts or pauses when you switch. With ⚙ → PLAY OPTIONS on a video, playlist or Website URL tile you can choose differently for that one input:
- Same as Settings – follows Settings → GENERAL (the window shows if that is On or Off). This is how every input starts.
- On – for this input / Off – for this input – always, whatever Settings says.
For example: the countdown video always restarts and plays when it goes to Program, but the worship playlist keeps its place. Reset all to “Same as Settings” removes the input's own choices. The ⚙ turns gold when an input has its own options, and they are saved in templates.
Playlist
Several videos, songs and pictures in one input, played in order. Select files when you add it (hold Ctrl to pick several). Edit the list in the PlayList panel. Pictures in a playlist show for the number of seconds set in Image … s.
Image / logo
JPG or PNG. A PNG with a transparent background is perfect for logos and bugs: put it on an overlay layer and it sits on top of the camera. To make it smaller, put it in a corner or make it see-through, use ⚙ → PICTURE. Very large photos are automatically reduced to save memory.
Quick Prompt and Basic lower third
Quick Prompt (called Title / Verse before rev29; a new layout comes later) fills the screen with text on a dark background – ideal for Bible verses and announcements. Basic lower third is a name strip at the bottom with a transparent background – use it as an overlay over a camera. Change the text later with the ⚙/Edit option on the tile.
Audio only: audio file and audio input device
- Audio file – MP3, WAV, M4A and other sound files. Works like a video file without a picture: ▶ on the tile, Loop, Quick Play. Its tile shows ♪.
- Audio input device – a microphone, a sound mixer or the audio of a capture card, as its own input with its own fader in the Audio Mixer. The sound comes in clean (no echo cancellation or noise suppression), and it starts with Audio off to avoid feedback – turn it on when needed.
Colour, Screen / Window
- Colour – a window opens first so you can choose:
- Colour: pick from the swatches, the More colours picker, or type Hex (e.g.
#245cbf), RGB (0–255) or CMYK (%). All boxes follow each other. CMYK is a simple conversion without a printer profile. - Blank (transparent): a see-through input with nothing in it. Use ▣ Layers to build a picture on it – for example two cameras side by side or a camera box with a logo – and put it on an overlay over anything. On Program by itself it shows black. Its tile shows a grey checkerboard.
- Colour bars: the SMPTE HD test pattern (RP 219, 75 %), the same as vMix / FFmpeg, for checking projectors, TVs, streams and recorders.
- Colour: pick from the swatches, the More colours picker, or type Hex (e.g.
- Screen / Window capture – show a PowerPoint, a website or your whole screen. The browser asks which window to share.
- Change screen / window… (right-click the tile, or ⚙ → SCREEN): pick another screen, window or tab. It takes the same input's place – same number, tabs, layers, overlays and sound settings (fader, M A B C, R, delay).
- ⚙ → SCREEN shows what is shared now (screen, window or tab, its name, size and sound). Share the sound too applies from the next Change (Chrome shares sound for a tab, and on Windows for a whole screen; not for a single window). Keep this input when sharing stops (on by default): when you click the browser's Stop sharing or close the window, the tile stays and shows Sharing stopped – choose Change to pick again. Off = the input closes, as before.
- Hide the mouse pointer is not possible yet: Chrome always shows the pointer in a screen capture. It is planned with a capture by AntzMix Service Relay.
Digital Bible (MCGI tier)
The Digital Bible input shows the verses that a Digital Bible Hybrid Edition 2026 operator sends (bible.mcgi.app) – live, in the Digital Bible look. It is part of the MCGI tier; while AntzMix is in its test phase it is open to everyone. It works in the browser, no relay needed.
- Add Input → Texts (prompts) → Digital Bible. The Digital Bible window opens.
- Source: click it and choose an operator or a Live Quad position (Q1–Q4). The list shows PINNED, LIVE QUAD, STREAMING OPERATORS and ME OPERATORS; type in the search box to find any operator by name. Click ☆ to pin a source to the top (kept on this PC). Green dot = online, orange = reconnecting, grey = offline. Add stays grey until you choose a source.
- Version: Auto shows the verse as the operator sends it; choose a version to always show that one. If a verse is not in the chosen version, its note is shown instead.
- Background: Same as operator, one of the Digital Bible backgrounds, or Transparent (overlay) – only the text, to put the verse over a camera (use it as an overlay or a layer).
- Safe margin (bottom): keeps the bottom of the picture free, for example for a lower third. Same as operator uses the operator's choice.
- The big picture on the right is a live preview. Click Add.
- Standby and BRB always follow the operator: the standby screen when nothing is on Live, and the BRB sign (bottom left) when the operator is away.
- A position (Q1–Q4) follows the same rule as the Digital Bible viewer: the first new verse from any of its operators goes on air, and a verse that was already shown is not brought back by a late operator.
- Change the settings later with ⚙ → DIGITAL BIBLE. A template keeps the source and the settings – never the verse; it always shows what the operator sends now.
- AntzMix only reads the Digital Bible feed – it never sends anything to Digital Bible. It needs an internet connection.
FrameSets (a background with framed slots)
A FrameSet puts several inputs on one picture: a background with framed boxes (slots), and any of your inputs in each slot – for example the speaker big on the left and two guests on the right.
- Add Input → FrameSets. The FrameSet window opens.
- LAYOUT (left): choose how many slots and where they are. The layouts are sorted by the number of slots, from 1 to 9. The numbers show the slots.
- BACKGROUND: choose a preset, or Upload from this PC… to use your own picture. Your own picture is not saved in templates yet; a template opens with the preset.
- SLOTS: for each slot choose an input (camera, video, picture, website …) or leave it empty. The input fills its slot – what does not fit is cut off (change this per slot, see below).
- FRAME STYLE: Rounded corners (how round), Border (thickness and colour) and Shadow (distance and size) – each can be switched off. The style is set once for the whole FrameSet, but the frame belongs to each input: it sits around the input wherever you move it. An empty slot shows its frame where the slot is.
- Fine-tune a slot: click the slot in the big picture (or its number on the right). Under the picture you then set, for that slot only: Fit mode – Crop (fills the slot, the edges are cut off; called “cover” or “Fill” in other programs), Fit (the whole picture as big as fits, the background shows around it; “contain”) or Stretch (the whole picture stretched to the slot shape, it can look squeezed); Position X and Position Y (move the input with its frame left / right and up / down, in pixels of the output); Zoom XY (the input with its frame bigger or smaller, keeping its shape), Zoom X (only wider / narrower) and Zoom Y (only taller / shorter). In Fit mode the frame hugs the picture. Reset slot puts it back. The same input elsewhere is not changed.
- Give it a name and click Add. The big picture shows exactly what goes live; the slot numbers are never shown on air.
- Change it later: ⚙ on the FrameSet tile → FRAMESET.
- Transitions: with Merge, inputs that are in both FrameSets glide from their old place to their new one, with their frames. Merge method (under the slot settings) decides what happens to the others: Fade – they fade out / in (an input the largest one covers stays solid underneath); Slide – they slide off the screen at their nearest edge, new ones slide in. The FrameSet you merge to decides. Cut, Fade and the T-bar work as always.
- If an input in a slot is closed, its slot becomes empty. Everything except your own background picture is saved in templates.
- Performance: the frames (background, borders, shadows) are drawn once; while live only the inputs in the slots are drawn – about the same work as the same inputs as layers.
Studio Call (call another AntzMix, or guests with a link)
Studio Call brings people into your show live: another AntzMix operator, or a guest on a phone or laptop – no app, just a link. Picture and sound go directly between the computers (no server in between), so the delay is very short.
- Add Input → Online → Studio Call. Choose Single Call (one to one) or Studio Call (you host, up to 4 guests). Give the call a name, choose what you send (Program, Preview or an input) and the quality (720p or 1080p).
- Click Start. The link is copied – send it to your guests. The Studio Call panel opens at the bottom (button Studio Call in the bottom bar).
- A guest on a phone or laptop opens the link, types a name and taps Join. They see your picture, and a gold ON AIR when you use their camera. Another AntzMix joins with Add Input → Studio Call → JOIN A CALL (paste the link) and chooses what it sends you.
- In a Studio Call each guest waits in your list with a small picture. Click Add as input to make them an input, ready for mixing (FrameSets, layers, Cut, Merge…). In a Single Call the other side becomes an input by itself.
- What a guest gets: “Send to guests” in the panel sets it for everyone; ⚙ on a call input → CALL sets it for that guest only (Program, Preview or an input) and its quality.
- Sound: each guest's sound is in the Audio Mixer like any input. Each guest hears everything except himself (mix-minus). Guests should use headphones.
- Closing a call input only removes the input – the guest stays in the call (Add as input again). Remove in the panel takes a guest out of the call; End call for everyone ends it.
- Connection details (rev51hf01, rev51hf02): first the browser's own data, word for word – its connection states, every address pair it tried with its check counters (sent, answered, received) and any error codes; after it, marked as such, a reading of that data. the guest page and the guest's row show which address types each side offered (local, local name, internet) and the reason when a call does not connect – for example “this device could not find its internet address – UDP is blocked here”. A screenshot of that box is all we need to find a problem.
- DIRECT / NEEDS RELAY: every guest shows how it is connected. DIRECT = straight between the computers (best). NEEDS RELAY = that guest's network (a strict firewall, some mobile networks) blocks direct calls; that guest cannot join yet – try another network. The bottom bar counts them (“Call: 3 direct · 1 needs relay”) so we can see if a relay server is ever needed.
- Second screen: ⧉ Pop out on the Studio Call panel opens the call manager in its own window. ⇥ Back to the panel (or closing that window) puts it back; the call keeps running.
- Dropped connection: when a guest's connection drops (Wi-Fi change, a short network cut, the laptop's network waking up), it repairs itself: after 3 seconds the guest's side looks for a new path on the same connection (pictures and sound continue as soon as it is found), again every 12 seconds; after 4 tries it makes a fresh connection. The guest keeps his place and his input in the studio – layers, FrameSet slot, overlays and sound settings stay. Meanwhile the input and the guest list show reconnecting… (try N), and the guest's page shows ↻ Reconnecting… – please wait, keep this page open. A drop never shows NEEDS RELAY (that is only for a guest who could never connect). The connection details show Drops: N · back: N with the times – please send them when a call drops often.
- Upload: about 3.5 Mbps per guest at 720p (7 Mbps at 1080p) – 4 guests at 720p need about 14 Mbps upload on the host.
- Calls are not saved in templates – a template opens with a placeholder for each call input.
Phone camera (iPhone or Android, no app)
Any phone becomes a wireless camera with microphone. Nothing to install, and AntzMix Relay is not needed.
- On the PC: Add Input → Phone camera. A QR code and a 6-letter code appear.
- On the phone: scan the QR code with the camera app (or open
wemix.antzsolutions.com/camand type the code). - Press Start camera and allow the camera and microphone. Hold the phone sideways for a 16:9 picture.
- The phone connects within a few seconds and the input shows its picture. The window on the PC closes by itself.
- Tally: the phone shows a red LIVE frame when its picture is on Program (or an overlay), green PREVIEW when it is in Preview.
- On the phone: ⟲ Flip front/back camera, Mic on/off, quality 480p / 720p / 1080p, Stats shows resolution, frame rate, bitrate, delay and any packet loss.
- Full screen: ⛶ Full screen uses the whole phone screen for the picture, with the buttons floating on top. On Android (and iPad) it is real full screen and turns to landscape. On iPhone, Safari doesn't allow web pages to go fully full screen, so the picture fills the page and the Safari bars shrink when you turn the phone sideways. ✕ Exit full screen returns to the normal view.
- 📌 On top: on (blue) = in full screen the buttons and stats stay on top of the picture. Off = they hide 4 seconds after your last touch; tap the picture to show them again, tap again to hide. The LIVE / PREVIEW tag and the red/green frame always stay visible. The phone remembers both choices.
- Long services (2–3 hours): keep the phone on its charger (a 720p camera uses a lot of battery and gets warm – take off a thick case), turn off auto-brightness or lower it, and put the phone in Do Not Disturb so calls and notifications don't interrupt the camera. If the camera is interrupted anyway (a call, Siri), the page gets it back by itself and the connection stays up.
- On the PC: hover the tile to see the same numbers; the tile says weak Wi-Fi if the picture keeps dropping below 15 fps or loses packets. ⚙ on the tile shows the QR code again (to connect another phone), rename, or remove.
- Sound: the phone's microphone arrives with Audio off, like a camera mic – turn it on in the tile or Audio Mixer when you need it.
- Phone and PC should be on the same Wi-Fi – the picture goes straight from the phone to the PC, not through the internet. 720p is the safest choice; use 480p on busy Wi-Fi.
- Keep the phone page open and the screen on (AntzMix asks the phone to stay awake). On iPhone the camera pauses if you lock the screen or switch apps; it reconnects when you come back.
- Phone as an NDI camera: put the phone input on Settings → NDI® OUTPUT → Input A and vMix sees it as the NDI source AntzMix Input A.
NDI® source (vMix, NDI cameras, NDI Webcam, OBS)
Brings any NDI source on your network into AntzMix as an input: a vMix output or final mix, an NDI PTZ camera, a phone running an NDI camera app, NDI Webcam / Screen Capture from NDI Tools, OBS with DistroAV, or another AntzMix PC. Needs AntzMix Relay 1.8 with the NDI Runtime (if something is missing, clicking Add Input → NDI® sources shows what to do).
- Add Input → NDI source. AntzMix searches the network and lists every source by name, with the PC it comes from.
- Pick one, give it a name, choose the quality and press Add.
- Full quality receives the picture as sent (best for cameras and a final mix). Low bandwidth asks NDI for a smaller picture – lighter on the network and the PC, good for monitoring or a confidence feed.
- Transparency is kept: an NDI title or lower third (for example from vMix) can go on an overlay layer over your cameras.
- Its sound appears in the Audio Mixer like any input. The tile header shows connecting… or no signal if the sender stops; AntzMix reconnects by itself.
- Not in the list? The sender must be on the same network, and Windows Firewall must allow Node.js JavaScript Runtime on Private networks.
- Each 1080p source uses roughly 90 MB/s between the relay and the page inside your PC – use Low bandwidth for sources you only monitor.
GT Titles (vMix .gtzip)
AntzMix opens title templates made for vMix (.gtzip files from GT Title Designer, or bought template packs) and plays their animations. Add Input → vMix GT title (.gtzip) and choose the file.
- On an overlay layer (the usual way for lower thirds): turning the layer on plays the title's In animation; turning it off plays its Out animation and then removes it. Press the layer button again during the Out animation to remove it at once.
- Cut or Fade to Program plays the In animation.
- Edit the title: ⚙ on the tile opens the GT title window. The big picture on the left is a live preview: every change shows there at once, over Program, Preview or a checker pattern (to see what is see-through). ▶ Play In / ▶ Play Out play the animations in the preview only. Nothing goes on air until you press Save; Cancel leaves the title as it was.
- TEXT: one row per text field. Type the text, or pick a ▦ column of the data (blue text = from the data). The colour box changes the text colour; ↺ brings back the title's own colour.
- Dates: write a formula in { } and AntzMix fills in today's date: {MMMM dd, yyyy} → NOVEMBER 03, 2026, {Mmmm dd, yyyy} → November 03, 2026, {dd/mm/yyyy} → 03/11/2026, {dddd} → Tuesday. d dd = day, ddd dddd = day name, m mm = month number, mmm mmmm = month name, yy yyyy = year. Capitals in the formula = capitals in the words: MMMM → NOVEMBRO, Mmmm → Novembro, mmmm → as the language writes it (novembro). Dates in chooses the language of month and day names, for each title (for example Português: {dd} DE {MMMM} DE {yyyy} → 03 DE NOVEMBRO DE 2026). The word TODAY in a field or in the data becomes today's date, written as set in TODAY =. The date changes by itself at midnight.
- PICTURES: one row per picture of the title. Title's own, Own picture… (Change… opens a picture from the PC) or a ▦ column of the data. The new picture takes the place and the shape of the title's picture (a round logo stays round): Fill (crop), Fit or Stretch. ↺ = back to the title's own.
- Data source (top right of the window) – fill the title from a table, one row at a time:
- Google Sheet (live link): share the sheet as Anyone with the link can view, paste its link and press Read. AntzMix reads it again every 30 seconds (● live), so changes in the sheet appear by themselves. It keeps the last copy on this PC: without internet the title keeps working with that copy (⚠ offline).
- Excel / CSV file: for offline use. Choose an .xlsx (first sheet) or .csv file. In Chrome and Edge AntzMix reads it again each time you save the file.
- The first row holds the column names. Fields and pictures with the same name as a column (for example TITLE ↔ Title) are linked by themselves; change it in the ▦ lists.
- DATA under the preview: click a row, or use ◀ ▶. Tick Next row each time the title goes on air to step through the rows automatically (overlay on, Cut, Fade).
- Pictures in the data: a web link (https://…; a Google Drive share link works when the file is shared with anyone with the link), or a file name (for example logo-sul.png). For file names, choose the Pictures folder… once (Chrome asks – choose Allow on every visit); sub-folders one level deep are searched too. A picture that is not found keeps the title's own and shows ⚠ with the reason.
- Templates keep everything: texts, colours, links to columns, language, own pictures, the data source and the row.
- Fonts: titles name their fonts; AntzMix uses the font if it is installed on the PC, otherwise it loads it from Google Fonts (most vMix template fonts are there, e.g. Ranchers). If a font is not available, a similar standard font is used.
- What is supported: layers, images (with transparency), text fields, rectangles and ellipses; animations Fade, Reveal, Wipe, Slide, Zoom, ZoomFade, Bounce, Typewriter and Hidden with their Delay, Duration, Direction and easing (Linear, Cubic, Bounce). Other effects play as a Fade, and AntzMix tells you when you open the title. Page and Continuous storyboards and tickers are not played yet.
Zoom call / meeting (participants in, AntzMix out)
AntzMix joins a Zoom meeting like an extra participant called AntzMix Studio. It brings each person in as a clean picture + sound you can mix, and it sends your Program (or Preview, or any input) into the meeting as its camera, with your sound as its microphone. It uses Zoom's official Meeting SDK, the same method as vMix and ZoomISO. Needs AntzMix Relay 1.10 with the AntzMix Zoom add-on on Windows: run Setup AntzMix Service Relay and tick Zoom call add-on (a one-time download of about 150 MB). If something is missing, clicking Add Input → Zoom call shows what to do.
- Add Input → Zoom call. Enter the meeting ID and passcode, and the name AntzMix should have in the meeting.
- AntzMix must be host or co-host to receive pictures. Either the host clicks Participants → AntzMix Studio → More → Make co-host, or you enter the meeting owner's host key (a 6-digit number in the Zoom profile, not the password) and AntzMix becomes host by itself – useful when the owner is not there.
- Press Join. The Zoom call input shows whoever is speaking, with the whole meeting's sound.
- Press ⚙ on the Zoom call tile → ZOOM MANAGER. Next to each person: Add as input gives them their own input, like a camera.
- What AntzMix sends: Program (default), Preview, any input, or nothing. Zoom decides the size it wants for AntzMix's camera (on a free Zoom plan often 640×480); AntzMix always fits the whole 16:9 picture into it without stretching – Zoom trims the thin black bars. Largest picture sent sets how big AntzMix prepares it (720p is plenty unless your Zoom plan allows 1080p). The sound sent is the master mix without the meeting's own participants (mix-minus), so nobody hears themselves back. Untick Send AntzMix sound to send only the picture.
- What AntzMix receives: participant pictures at 360p, 720p or 1080p, and their sound (untick Receive participants' sound to mute everything from the meeting).
- Sound without doubling: the Zoom call input carries everyone's sound; a participant input starts with its Audio off. For a separate fader per person, turn Audio on for the people and off on the Zoom call input.
- Quality depends on the Zoom plan of the meeting: Free 360p per person, Pro 720p, Business/Education/Enterprise up to 1080p (HD must be on in the Zoom settings, and senders must enable HD).
- Free Zoom plan: meetings end after 40 minutes and pictures are small (about 360p). Use a paid plan for services.
- When a meeting ends, the tile says why, e.g. ended – Zoom free plan time limit reached (40 minutes), the host ended the meeting or the host removed AntzMix from the meeting (relay 1.12).
- Leaving and joining again right away is safe from relay 1.12: AntzMix waits a moment until the previous Zoom connection has fully closed (before, this could fail with "Zoom SDK could not start (code 14)").
- Making AntzMix host: when the host (or a co-host) makes AntzMix Studio host or co-host in Zoom, the participant pictures start within about 2 seconds – no need to rejoin.
- Which meetings: until the AntzMix Zoom app is approved on the Zoom App Marketplace it can join only meetings owned by the Zoom account the app belongs to. Other meetings show could not join.
- Changes in the Zoom Manager apply at once; Leave meeting (or removing the input) leaves the call and removes its participant inputs.
Zoom is a trademark of Zoom Communications, Inc. AntzMix is not made or endorsed by Zoom.
Website URL (a real, interactive browser)
Show any web page as an input: a scoreboard, a live ticker, a countdown, a lyrics page, a web dashboard or a YouTube video. A small browser inside AntzMix Service Relay – the Website add-on – opens the page and sends its picture and sound to AntzMix. Needs AntzMix Service Relay 1.16 with the Website add-on on Windows. If something is missing, Add Input → Website URL shows what to do: Install the Website add-on opens Setup with Website add-on ticked; click Install. It downloads the add-on once (about 180 MB). The relay stops for about a minute while it installs, so do this before the service. From relay 1.17, if our server would take more than 5 minutes from your location, Setup switches to a faster download server (Cloudflare) by itself – this also helps the Zoom call add-on.
- Add Input → Website URL. Type the address, for example
youtube.com/watch?v=…(https://is added by itself). Only web pages (http / https) can be opened, not files on the PC. - Choose the Page size (Same as output, or Custom…) and the Frames per second: 24 is the default; 30 or 60 make video and scrolling smoother but use more CPU.
- Click Add. The tile shows opening page… until the page arrives.
- ⌨ Interact: opens a big view of the page. Your mouse and keyboard now go to the page: click, scroll, type, sign in, press play. The status bar shows ⌨ Keyboard → name · Release, so you always know where your typing goes, and AntzMix shortcuts are paused. Press Esc, Release (Esc) or Done to give the keyboard back. Back ◀, Forward ▶, Reload ⟳ and the address are at the top. While you interact the input shows the whole page – if it is live, viewers see what you do. While ⌨ is on you can also click directly on the Preview or Program monitor when it shows this input (gold frame).
- Transparent background (off by default): for overlay pages such as scoreboards and tickers. Only what the page paints is shown; the empty parts let the mix show through. Normal websites paint their own background, so they stay solid.
- Video sites: show the video full screen (ticked by itself for YouTube addresses): the page's main video fills the input, like full screen in a browser. What Preview shows is what goes live: if the video is not full screen yet when you click Cut, Fade, Merge, Quick Play or an overlay button, AntzMix first makes it full screen in Preview and then switches (it waits at most 1.5 seconds). If a site does not allow full screen, AntzMix cuts the video out of the page instead.
- Sound starts off – switch it on in the Audio Mixer, or let Automix audio do it.
- Video controls: when the page has a video, the tile's ▶ and the monitor's timecode, seekbar and restart control the page's main video, like a video file. The page's own controls (for example YouTube's) still work as a fallback – use them with ⌨. Opening or closing ⌨ never plays or pauses anything.
- Silent on load: a page that loads – also after Back, Reload or a new address – starts paused, and the input's sound is off. Nothing plays until you press ▶ (or Quick Play / auto play), or click in the page with ⌨.
- At the end the video stops on its last frame, so the site does not go on to its next video. Press ▶ to play it again from the start.
- Ads play as on the site. Skip one with ⌨ when the site shows its "Skip" button. While an ad plays, the seekbar is greyed.
- Play options (⚙ → PLAY OPTIONS): auto play, Automix audio, restart and pause – this input's own choice first, otherwise Settings → GENERAL, exactly as for a video file.
- ⚙ → WEBSITE changes the address, page size, frames per second and the two ticks later. Everything is saved in templates. Sign-ins and cookies stay on this PC, like in a normal browser.
- YouTube and other video sites play as in a normal browser, with their ads. Only show videos you are allowed to use: YouTube's rules and Content ID can block or claim your live stream when it contains other people's videos or music.
- Limits: the add-on is built on the free Chromium browser (CEF). It cannot play protected videos (Netflix, Disney+, Spotify), and videos that only come as H.264 / MP4 (some news and social media sites) may not play. Pop-up windows open in the same input. Windows only for now; a Mac version is planned.
RTMP / SRT stream source
Bring a live stream into AntzMix as an input – another studio, a remote speaker, a phone, an IP camera. Needs AntzMix Relay 1.7 running (if it is not, clicking the menu item shows what to do).
- Pull from an address – paste an
rtmp://,rtmps://,srt://,rtsp://or HLShttps://….m3u8address. Example: the server address and key of a restream service, or an IP camera's RTSP address. - Receive on this PC – AntzMix shows a Server (e.g.
rtmp://192.168.1.20:1935/live) and a Stream key. Enter both in the sending app (Larix Broadcaster, PRISM Live, OBS, a hardware encoder). Both devices must be on the same network; the first time, Windows Firewall asks about ffmpeg – click Allow (Private networks).
The tile header shows connecting…, waiting for sender or no signal – retrying until pictures arrive. Delay is about 1–3 seconds; AntzMix keeps it close to live. H.264 sources are passed through without re-encoding; other codecs (e.g. HEVC) are converted, which uses more CPU. Sound goes through the Audio Mixer like any other input.
Templates (save & open)
A template is one small file (ending in .antzmix) that remembers your whole board, so you can set up a service once and bring it back next time in seconds. Use the 📂 Template ▾ button next to ADD INPUT. The template's name is shown next to it; an orange dot means there are changes that are not saved yet.
| Menu item | What it does |
|---|---|
| New (empty) | Removes all inputs and starts again with the colour bars. |
| Open template… Ctrl+O | Opens a .antzmix file. It replaces the current inputs (AntzMix asks first if they are not saved). |
| Save Ctrl+S | Saves into the same file again. The first time, you choose the name and folder. |
| Save as… Ctrl+Shift+S | Saves a copy under a new name. |
| Save with media… | One big file that also contains all videos, pictures and GT titles – to move a show to another PC or send it to someone. Up to 3.9 GB of files. |
| Recent | The last 6 templates you opened or saved, one click to open again (Chrome / Edge). |
What a template remembers
- Every input in its order and with its name, Audio on/off and volume, Loop, layers (boxes) and which overlay it is on.
- What is on Preview and Program, which overlays are on, the transition time (ms) and the output format (for example 720p30 16:9 – not changed while you stream or record).
- Texts of Quick Prompts, lower thirds and GT titles, colours, and the order and ticks of playlist items.
- Live sources come back by themselves: cameras and microphones (found again by their name), NDI® sources, RTMP / SRT sources. Phone cameras get a new QR code (click ⚙ on the tile).
- Never saved: stream keys, the Zoom passcode and host key, and the relay token. A template can be shared safely.
Video, picture and audio files
A browser cannot keep the full path of a file you picked, so a template stores each file's name and size. When you open it, AntzMix asks once for the folder with your media and looks in it and its sub-folders. If Chrome asks, choose Allow on every visit: next time AntzMix finds the files in that folder by itself.
A file that is not found becomes a red tile in its place, with Locate… (pick that file) and Folder… (search another folder for all missing files). The rest of the template works normally, and the file keeps its number, overlay and layer when you find it.
Some inputs always need one click after opening, because the browser or Zoom asks again: Screen / Window capture (Choose screen…) and Zoom call (Join… – the meeting ID is filled in, the passcode is not saved).
Restore the last state
Tick Restore the last state when AntzMix opens (in the Template menu or Settings → GENERAL) and AntzMix brings the board back after a reload or a browser crash – when you close the start-up window without a choice (Esc or a click outside it). It is kept in this browser only, not in a file, and it is off by default.
The start-up window
When AntzMix opens, a window covers the screen until everything is loaded, so nothing is clicked before it can work. It shows the logo, what's new in this version and a status bar along the bottom with each loading step:
- the page and its look,
- the program (with a percentage – on a slow internet line this step takes longest),
- starting the program,
- cameras and microphones,
- AntzMix Service Relay (Windows; AntzMix waits at most 3 seconds – a relay that is not running does not stop AntzMix),
- your recent templates.
When the bar turns green, the same window becomes Open a template:
| Choice | What happens |
|---|---|
| OPEN (gold box) | Opens the last open template – its name, when it was last used and how many inputs it has are shown in the box. Grey when there is none yet. |
| Recent templates | One click opens that template (Chrome / Edge). |
| Open a file… Ctrl+O | Pick any .antzmix file. |
| Start new (empty) | The two starter inputs, as always. |
| Esc or a click outside the window | No choice: AntzMix opens as it did before this window – with the last state if Restore the last state is ticked, otherwise with the starter inputs. |
If the program cannot be loaded (for example the internet connection dropped), the bar turns red and shows Reload.
Input tiles & buttons
Click a tile's picture to send it to Preview; double-click to cut it straight to Program. The header turns blue when the input is in Preview and red when it is on Program.
- Move a tile: drag it by its title bar. A gold line shows where it lands. The inputs are numbered in the new order, and the keys 1–9 follow the new numbers.
- Minimize a tile: right-click its name bar (or choose Minimize in the right-click menu). It becomes a slim vertical bar with its number and name, as tall as the other tiles – to make room once a FrameSet is set up. Click the bar for Preview, double-click to Cut, right-click to restore it.
- Templates keep the order and which tiles are minimized.
- Input tabs (above the tiles): ALL always shows every input. + adds your own tab (for example Worship, Speakers). Put an input in a tab by dragging its tile onto the tab, or with the right-click menu → Add to tab. One input can be in several tabs. Click a tab to see only its inputs; an input you add while a tab is open also goes into that tab. Right-click a tab to rename or delete it – deleting a tab never deletes inputs. Templates keep the tabs.
- Mouse wheel over a number field (size, position, opacity, crop…): up +1, down −1; over a slider: one step. It works only while the pointer is on the field.
| Button | What it does |
|---|---|
| Close | Removes the input. |
| Quick Play | Starts playing and cuts to Program in one press. |
| Cut | Cuts to Program. By default it keeps the play state (playing stays playing, paused stays paused) – change this in Settings → GENERAL. |
| Loop | Repeat the video / playlist (green = on). Works wherever the input is. |
| ▶ / ❚❚ | Play / pause. |
| 1 2 3 4 | Put this input on overlay layer 1–4 (blue = on). Press again to take it off. |
| Audio | This input's sound on/off (green = on). Greyed out when the input has no sound. |
| 🖥 (monitor icon) | Show this input in a bigger window of its own. |
| ⚙ | Input Configuration: picture (opacity, size, position, crop, rotate, flip) and the input's own settings – text, colour, website, play options, QR code (phone), Zoom Manager. A gold ⚙ means the input has its own picture settings or play options. Greyed out for audio-only devices (no picture, no settings yet). |
Input Configuration (⚙)
⚙ on any tile opens Input Configuration: one window with every setting of that input. The tabs on the left show what this input has:
- PICTURE – every input with a picture. It changes how the input looks wherever it is shown: Preview, Program, overlays, layers and its tile.
- Opacity 0–100 %: 100 = solid, 50 = half see-through, 0 = invisible. Use it for a soft logo, or to mix two inputs half and half: put one on the other as a layer (▣) at 50 %. Under the bottom input there is black, so one input at 50 % alone on Program looks darker, not see-through.
- Size 1–400 % with 🔒 Keep aspect ratio (the width-to-height shape). Click the lock to set Width and Height apart. Left / right and Up / down move it: −100 or 100 puts its centre on the edge of the frame. Full, the four corner buttons and Centre place it quickly.
- Crop cuts the left, right, top and bottom edge, in % of the picture.
- Rotate from −180° to 180° (⟲ 90° / ⟳ 90° turn a quarter). ⇆ Flip mirrors it left–right, ⇅ Flip turns it upside down.
- Every setting has a slider and a number box. Changed values get a gold border. Reset picture puts everything back to normal.
- The input's own settings, the same as before: TEXT (Quick Prompt, lower third), TITLE TEXT (GT titles), COLOUR, WEBSITE, PLAY OPTIONS (video, playlist, website), PHONE CAMERA and ZOOM MANAGER.
The small picture in the window shows the result (the squares = see-through). Nothing changes in Preview or Live until you click Save; Cancel or Esc leaves everything as it was. A gold line tells you when the input is on air. The ⚙ turns gold when the input has its own picture settings or play options. Everything is saved in templates.
Performance: opacity, size, position and crop cost almost nothing. Rotating and flipping live video use some extra computer power on PCs without graphics acceleration. Inputs left at normal cost nothing extra.
Preview, Program & transitions
- Cut – instant switch from Preview to Program. What was on Program goes back to Preview.
- Fade – smooth cross-fade. Set its length in ms (1000 ms = 1 second).
- Merge – like vMix: an input that is in both Preview and Program moves and resizes from its old place to its new one (for example a camera that is full screen on Program glides into its corner box on a slide), everything else fades. Uses the same ms length as Fade. Without layers it looks like a Fade.
- Quick Play – plays the Preview input and cuts it to Program.
- FTB – Fade To Black: fades the whole output to black (blue while active). Press again to come back.
Under each monitor, video inputs show position / duration / time remaining, a seek bar, Restart and play/pause. For a playlist there are also ⏮ ⏭ for the previous / next item.
T-bar (mix by hand)
The T-bar stands in the middle column, next to the transition buttons. It mixes the Preview input into Live by hand, at your own speed. It takes the colours of the chosen theme.
- Drag the grip towards LIVE (or turn the mouse wheel over it): Preview mixes in over Live, and the grip shows how far (for example 42%). At the end the mix is complete – Preview and Live swap, as after a Fade. A single click never moves the bar; only dragging does. After a complete mix, let go of the mouse before you start the next one.
- Double-click the T-bar to complete the mix at once. Shift + double-click takes a half-way mix back (Live as before).
- Let go half-way and the mix stays as it is (both inputs show). Drag it back to the start and nothing changes.
- Auto return (Settings → GENERAL → T-bar): Yes (normal) = when the mix is complete the bar springs back to the bottom, LIVE stays at the top. No = the bar stays where it ended, like a hardware T-bar; the LIVE and PREVIEW labels swap ends and the next mix goes the other way.
- Transition while half mix (same place): Auto Complete (normal) = Cut, Fade, Merge or Quick Play finish a half-way mix from where it is. Stay = the mix stays; those buttons are greyed until you finish with the T-bar.
- When an automatic Fade runs, the grip moves along by itself. The T-bar is greyed out while Preview and Live show the same input.
- On the right of the T-bar, from the bottom to the top, is the Master audio meter (green, yellow near the top, red = too loud) – the same level as Master in the Audio Mixer. The speaker button 🔊 at its bottom (like the On / Off button under each fader in the Audio Mixer) turns Master audio off (🔇, red) and on again – the same as the Master On / Off button in the Audio Mixer.
- 4 buttons under it – your own: right-click a button (or click an empty +) and choose what it does: Cut, Fade, Merge, Quick Play, Fade to black, Overlay 1–4 on / off, Stream start / stop, Record start / stop, Audio Master on / off, or put a chosen input in Preview. Rename this button… gives it your own short name; Clear empties it. A button is blue (red for Stream / Rec) while what it controls is on. The buttons are remembered on this PC.
- ⧉ Float takes the whole middle column – transition buttons, overlay buttons and T-bar – into its own small window that you can drag anywhere (by the dotted bar at its top). The ⧉ / ⇥ button sits at the bottom-left corner of the T-bar, opposite 🔊. Preview and Live then sit side by side. ⇥ Dock puts it back. AntzMix remembers where it was. The T-bar's buttons always end level with the overlay buttons 1–4.
Performance: the T-bar draws only when it moves; the meter updates about 12 times a second. No extra load on the computer worth noting.
Layers (picture-in-picture)
Press ▣ on an input tile to put up to 4 other inputs on top of it as boxes – a camera in the corner of a slide, two cameras side by side, a logo box. Pick the input, a position (box top-right / top-left / bottom-right / bottom-left, left or right half, centre box, full screen) or type Left · Top · Width · Height in %. The input then always shows with its boxes – in the tiles, Preview, Program, NDI and the camera output. Layers are not saved yet when you reload the page.
What happens to sound and playback when an input goes on or off air is set in Settings → GENERAL (auto audio, auto play, restart, pause).
The monitors always keep the output shape (16:9 or 4:3, see Settings). Sources with a different shape get black bars.
Overlays (logo, lower thirds)
Overlays sit on top of Program, whatever is underneath. There are four layers; layer 4 is on top.
- Add a transparent PNG logo or a Lower third.
- On its tile press 1 (or 2, 3, 4) – it fades in on Program. The tile shows OVL 1.
- Press the same button again – it fades out.
The 1 2 3 4 buttons in the middle column switch a whole layer on/off, using the input last assigned to it.
The PlayList panel
Choose which playlist to edit in the drop-down (all Playlist inputs are listed).
| Action | How |
|---|---|
| Play an item now | Double-click it. |
| Previous / next item | ⏮ ⏭ next to the drop-down (or under the monitor). Skips unticked items; wraps around when Loop is on. A playing playlist keeps playing. |
| Include / skip an item | Click its tick box. Ticked = plays; empty = skipped by Auto Next and Loop (shown struck through). |
| See what is playing | The current item's row is green (bright while playing). |
| Select | Click = one item · Ctrl+click = add/remove · Shift+click = range · Ctrl+A = all (mouse over the list). |
| Re-order | Drag an item (or all selected items) to a new place – an orange line shows where it lands. Or use ▲ ▼. |
| Add files | Add, or drag files from Windows Explorer into the list. |
| Remove | Select, then Remove or the Delete key. |
| Auto Next | When an item ends, play the next ticked item (green = on). |
| Loop | After the last item, start again from the first. |
| Shuffle | Mix up the order. |
Audio
- Audio Mixer panel: a fader and meter for every input with sound, plus Master for the whole mix. On/Off is the same as the tile's Audio button.
- Master On/Off: On sends the mix out. Off silences everything that leaves AntzMix – the main audio output, the live stream, the recording, NDI and the sound sent into a Zoom meeting. Each input keeps its own On/Off, so when you turn Master on again, the same inputs are heard. When Master is off, its strip turns red and says Master OFF. It is On when AntzMix starts and is saved in templates.
- Audio delay (⚙ at the top right of each input strip): makes this input's sound come later, to put it in sync with the picture (lip sync). Type a number, drag the slider or use 0 / −10 / +10 / −100 / +100. The value is negative: −250 = the sound comes 250 ms later; up to −10,000 ms. 0 is at 3/4 of the slider and is the most – the slider does not go past it, because sound cannot come earlier than it arrives. The mouse wheel works on the number (±1) and the slider (±10). The delay is added before the fader, so Master, the buses A B C and the recording (R) all get it. A strip with a delay shows ⏱ −250 ms under its name. Saved in templates. Not for YouTube inputs (⚙ is grey: their sound does not go through AntzMix).
- Two rows: OUTPUTS above (Master, Bus A B C, ● REC), INPUTS below (every input with sound). Each row scrolls sideways on its own.
- M A B C under each input: M (blue) sends the input to Master; A, B, C send it to three extra mixes, the buses. Each bus has its own strip with a fader, a meter and On/Off. Under Master and each bus you see where that mix goes (for example → Main, Output 1), or not used. An input that is not sent to Master (M off) is also not in what Zoom and Studio Call guests hear.
- R under each input: R red = this input is in the recording. R takes the sound before the input's fader and before its On/Off, so a red-R input is recorded at full level even when it is off or silent in Master. Gray R = not in the recording. A new input starts with R like its sound: on for a video, off for a camera microphone (which starts Off). The ● REC strip shows the recording mix (its dot turns red while recording) and has one fader for the whole recording.
- Audio outputs… (top of the Audio Mixer): each output takes one mix – Master or a bus – and sends it to one place.
- Main: Master → your speakers or headphones (the same setting as Settings → AUDIO).
- Stream and NDI: take Master or a bus.
- Recording: the inputs with R on.
- + Add output: Output 1, 2 … – choose a mix and an audio device. To send a mix to Zoom, Teams or another app, choose a virtual audio cable as the device and pick that cable as the microphone in the app. Example: Pastor mic → Bus A → Output 1 → Zoom; Master → Output 2 → Teams; Intro video → Bus B → Stream.
- Where the sound plays: Settings → AUDIO → Main audio output. Choose speakers, headphones, or a virtual audio cable for Zoom/Teams. If the list shows only generic names, click Show device names and allow the microphone once.
- By default the live stream and the NDI Program source take Master; the recording takes the inputs with R on. Change it in Audio outputs….
- Master Off silences what takes Master (main output, and the stream, NDI and outputs that take Master). The buses and the recording mix are separate mixes and keep playing.
- Want sound to follow the picture (on when an input goes to Program, off when it leaves)? Tick Automix audio in Settings → GENERAL.
Getting the picture out
Projector or TV
Click Fullscreen output. A clean window with only Program opens; double-click it to go full screen (on a second screen when the browser allows). Keep it open while you work.
Screen outputs (second screen, projector, TV)
Click Screen outputs ▾ in the top bar. The button is grey until a second screen is connected. The first time, Chrome asks once to allow window management – allow it, so AntzMix can place a window on another screen.
- Each connected screen has a row. Choose what it shows: Program, Preview or any input, then Open. A window opens on that screen; double-click it for full screen.
- Clean (Program only): Program without the overlay layers – no logo, lower thirds or titles from overlays 1–4. Transitions and FTB are still in it.
- You can change what a screen shows while it is open; Close (or closing its window) ends it. The screen with AntzMix itself cannot be chosen.
- Each screen output costs some graphics power – keep only the ones you need open.
AntzMix Camera – Google Meet, Zoom, Teams, OBS
AntzMix Camera makes the Program output appear as a normal webcam called "AntzMix Camera" – next to your real camera, OBS Virtual Camera or vMix Video in the meeting app's camera list. Overlays, transitions and FTB are all in the picture.
- One time per PC: run Setup AntzMix Service Relay with AntzMix Camera ticked. Windows asks for administrator approval once – click Yes.
- Close and reopen Chrome / Zoom / Teams once, so they notice the new camera.
- Start AntzMix Relay, then press ● Cam in the AntzMix footer (or Settings → VIRTUAL CAMERA → Turn on). It turns blue.
- In Meet: Settings → Video → Camera → AntzMix Camera (Zoom/Teams: the camera menu next to the video button).
The Status shows in use by an app when a meeting app is showing the camera. Camera size 720p is recommended – Meet and Teams send at most 720p anyway, and it is lighter on the PC. AntzMix remembers that the camera was on and turns it back on after a reload.
Works with 64-bit apps on Windows 10/11 (Chrome, Edge, Zoom, OBS, most webcam apps). Some Microsoft Store apps (the Windows Camera app, possibly the new Teams) only list Windows 11 "Media Foundation" cameras – support for those is planned. AntzMix Camera is based on the open-source softcam library (MIT licence, © tshino).
Zoom / Teams by screen share
- Picture: open Fullscreen output, then in Zoom/Teams choose Share screen → Window → "AntzMix Output".
- Sound: set Settings → AUDIO → Main audio output to a virtual audio cable (e.g. VB-CABLE), then pick that cable as the microphone in Zoom/Teams.
- Usually better: use AntzMix Camera so AntzMix appears as a webcam.
Live streaming (YouTube, Facebook, RTMP)
- One time per PC: install AntzMix Relay.
- Start AntzMix Service Relay (desktop shortcut, or Start AntzMix Relay in AntzMix) – its icon appears next to the clock.
- In AntzMix: Settings → STREAMING (RTMP). Choose the service, paste the stream key (from YouTube Studio → Go Live → Stream, or Facebook Live Producer), pick a bitrate.
- Audio bitrate: 160 kbps is right for speech and worship music; choose 192 kbps for music-heavy services.
- Several platforms at once (optional): under Also stream to, tick up to two more destinations (YouTube, Facebook or Custom RTMP) and enter their server and key. AntzMix encodes once and the relay sends the same stream to all; if one fails, the others keep going. Your upload must carry the bitrate × the number of destinations (e.g. 3 × 4.5 Mbps ≈ 14 Mbps).
- Press Test relay – it should say Relay OK (version 1.4 or newer; it also tells you if NDI is ready).
- Press ● Stream in the footer. It turns red with time, bitrate and fps while live. Press it again to stop.
| Your upload speed | Choose |
|---|---|
| Under 4 Mbps | 2.5 Mbps, 720p |
| 6 Mbps or more | 4.5 Mbps, 720p (recommended) |
| 10 Mbps or more | 6 Mbps, 1080p (set 1080p in VIDEO OUTPUT) |
Checking quality: tick Local copy in Settings → STREAMING and the relay also saves exactly what is sent to YouTube as a file in %LOCALAPPDATA%\AntzHive\AntzMix\recordings. Play it back to judge the stream without YouTube or phone recording in between. Delete old copies from time to time – they take space.
The relay is needed because a web page cannot send RTMP by itself; the relay uses the free FFmpeg program on your PC to do it. In Chrome and Edge the video is already compressed in H.264, so the relay uses very little CPU.
NDI® output (vMix, OBS, NDI Monitor)
NDI sends AntzMix over your local network as sources that vMix, OBS (with DistroAV), NDI Studio Monitor and other NDI programs can pick up – no capture card needed.
- Install (or re-install) AntzMix Relay 1.4 and answer Y to Install the NDI Runtime.
- Start AntzMix Relay.
- Settings → NDI® OUTPUT: choose the sources, then tick Enable NDI output.
- In vMix: Add Input → NDI → YOUR-PC (AntzMix Program). The status shows how many receivers are connected to each source.
How do I know it is working?
- The AntzMix Relay box on the NDI page shows a green dot and Running v1.4 · NDI ready. Red = the relay is not running; "NDI Runtime NOT installed" = run Setup again and tick NDI Runtime.
- The first time, Windows Firewall asks about Node.js JavaScript Runtime – click Allow (Private networks). If you declined it, other PCs can't see the sources: allow "Node.js" in Windows Security → Firewall → Allow an app.
- After ticking Enable NDI output, the relay log (right-click the relay icon → Open log) gets a line per source, e.g.
NDI source "MYPC (AntzMix Program)" 1280x720 @ 30, and the NDI tab in Settings gets a green dot. - The Status line shows NDI on · Program: 1 rx – "rx" is the number of programs receiving it. 0 rx = nobody has opened it yet.
- Quickest check: open the free NDI Studio Monitor (NDI Tools) and pick the source from its menu.
AntzMix remembers that NDI was on and switches it back on when you reload the page (Program and Preview; Input A/B must be chosen again because inputs are not saved yet).
| Source | What it sends |
|---|---|
| AntzMix Program | The final output at the output resolution and frame rate, with the final mix sound. |
| AntzMix Preview | The Preview monitor (no sound). |
| AntzMix Input A / B | Any two inputs, each on its own (no sound) – e.g. a clean camera feed. |
Preview and inputs use a lighter size and rate (default 640×360 at 15 fps) to keep the CPU low; change it under Preview / inputs size and rate.
NDI® is a registered trademark of Vizrt NDI AB. ndi.video
Google Meet, Zoom, Teams only list cameras, not NDI sources – use AntzMix Camera for them. (NDI Tools' NDI Webcam Input also works, but AntzMix Camera needs no extra program.)
Snapshot (a photo of Live or Preview)
📷 Snapshot in the bottom bar saves a full-size PNG picture (for example 1280×720), named like AntzMix-2026-11-03_08-15-42.png. ▾ next to it opens the options:
- Program (Live) or Preview – which picture to save.
- Polaroid effect on Program (on air): a camera shutter closes over Live and opens on the photo; the photo zooms out to a tilted Polaroid on blue, stays for Hold the photo seconds (default 3), comes back to full frame and fades back to Live. Everyone watching (stream, recording, screen outputs) sees it. Only for Program; the button waits until the effect has finished.
- Two pictures with the Polaroid effect: the plain picture and the Polaroid (…_polaroid.png), side by side in the folder.
- Branding (optional): a picture shown in the white strip under the photo – the best size is 1920×192 px (10:1, PNG; see-through parts allowed). Another size is fitted into the strip. ✕ = no branding. Kept on this PC.
- Shutter sound in Master: the click is heard in Master (and what takes Master, such as the stream).
- Save to folder: Choose… a folder once; Chrome asks – choose Allow on every visit. ✕ = back to Downloads. Safari cannot choose a folder: snapshots go to Downloads, and the shutter picture is not shown there (the photo effect still runs).
- A shortcut key for Snapshot can be set in Keyboard shortcuts. The options are remembered on this PC.
Recording
Press ● Rec in the footer to record Program with the recording mix (the inputs with R on) to a file. It shows the time and size while recording; press it again to stop. Recording does not need the relay, and it can run at the same time as streaming and NDI.
- The first time, AntzMix asks for a folder (e.g. Videos). It remembers it; change it in Settings → RECORDING → Choose folder….
- The file is written to disk while you record (named
AntzMix_date_time.mp4), so long recordings don't fill the memory. - File type: Auto = MP4 when the browser can, otherwise MKV. Choose MKV if the PC might crash or lose power – an MKV is still playable up to that point.
- Quality: 8 Mbps video / 192 kbps audio is good for 720p and 1080p; 12 Mbps for top quality (about 5.4 GB per hour).
Installing AntzMix Relay (Windows)
From relay 1.11 the program is called AntzMix Service Relay. It installs in a normal window and then runs in the background with an icon next to the clock – no black window to keep open (or to close by mistake).
- Settings → STREAMING (or NDI, or GENERAL) → gold button Download AntzMix Relay for Windows.
- Recommended – tell Windows you trust the file: in your Downloads folder, right-click AntzMix-Relay-Windows.zip → Properties → at the bottom (Security: This file came from another computer…) tick Unblock → OK. Do this before Extract All: then the files inside are not marked as “from the internet” either, and Windows does not stop Setup with “Windows protected your PC”. It is your own choice to trust this one file; it changes nothing else on the PC.
- Right-click the zip → Extract All. Open the folder.
- Security warnings are expected for now (if you did not unblock the zip): Chrome may say the file "isn't commonly downloaded" or "may be dangerous" – open the download list and choose Keep. Windows may say "Windows protected your PC" – click More info → Run anyway. Reasons: AntzMix Relay is not code-signed yet (no paid publisher certificate, so "Unknown publisher"), it is new and rarely downloaded (no SmartScreen reputation yet), and it makes the relay start with Windows and registers a webcam component – things antivirus programs watch closely. From relay 1.18 Setup does all of this itself, in its own window, without PowerShell scripts.
- Double-click Setup AntzMix Service Relay. If Windows says "Windows protected your PC", click More info → Run anyway (why?).
- Tick what you need: AntzMix Camera (for Meet/Zoom/Teams – Windows asks for administrator approval once), NDI Runtime (only for NDI), Zoom call add-on (only for Zoom calls, about 150 MB), Website add-on (only for Website URL, about 180 MB), Start with Windows. Click Install.
- The window shows each step (Node.js and FFmpeg are installed only if missing), live progress for downloads (MB, speed, time left) and the details. The Zoom add-on (about 150 MB) is the last step: after you click Install/Update, Setup checks whether a newer one is on the site and downloads it only then. At the end it says AntzMix Service Relay is installed and the icon appears next to the clock (click ˄ there if it is hidden).
It is installed in %LOCALAPPDATA%\AntzHive\AntzMix\relay, with an AntzMix Service Relay shortcut on the Desktop and in Start → AntzHive. When you update from the older WebMix Service Relay, Setup moves its settings, the Zoom add-on and your recordings from AntzHive\WebMix to AntzHive\AntzMix (no new Zoom download) and removes the old WebMix shortcuts, program entry and start-up entry.
To update: right-click the icon → Check for updates, or run the new Setup – it closes the running relay first. To remove it: Windows Settings → Apps → AntzMix Service Relay → Uninstall (or Start → AntzHive → Uninstall AntzMix Service Relay).
Why does Windows show a warning?
When you open Setup AntzMix Service Relay, Windows may show a blue window: “Windows protected your PC – Microsoft Defender SmartScreen prevented an unrecognised app from starting.” Chrome may also say the download “isn't commonly downloaded”.
- Why: Windows checks two things about a downloaded program – whether it is signed with a paid publisher certificate, and whether many people have already run that exact file safely. AntzMix Service Relay is not signed yet and is still new, so Windows does not recognise it. Every new version starts again from zero.
- What it does not mean: it does not mean that a virus was found. Microsoft says so itself: Microsoft Defender SmartScreen – Frequently Asked Questions.
- Easiest – Unblock first: before Extract All, right-click the zip → Properties → tick Unblock → OK (steps). Windows marks every downloaded file as “from the internet”; Unblock removes that mark from this one file, with your consent, so the blue window does not appear. Limits: on a PC with Smart App Control turned on, Windows may still block a program that is not signed; on some work PCs the Unblock box is switched off by the IT department; your antivirus decides on its own. Code signing (planned) will make this step unnecessary.
- What to do (if you did not Unblock): in Chrome's download list choose Keep. In the blue window click More info, check that the app name is Setup AntzMix Service Relay.exe, then click Run anyway.
- Stay safe: only download the relay from inside AntzMix Studio (the Download button) or from this site. Setup shows everything it installs and asks before each step, and you can remove it at any time in Windows Settings → Apps.
The relay icon next to the clock
| Icon | Meaning |
|---|---|
| ● green dot | Running. |
| ● amber dot | Starting or restarting. |
| ● red dot | Stopped – right-click → Start relay. |
Right-click (or click) the icon for: Open AntzMix Studio, Restart relay, Stop / Start relay, Check for updates (downloads the new version and opens its Setup), Open log (the relay's messages, which used to be in the black window), Open relay folder, Start with Windows, About and Exit.
- Watchdog: if the relay stops unexpectedly, it is started again by itself within a few seconds and a small Windows notification says so. If it stops 5 times in 5 minutes it waits for you – look in Open log.
- "Another AntzMix Relay is already running" means an old black relay window is still open: close it, then right-click the icon → Start relay.
- Exit closes the relay and everything it runs (streaming, AntzMix Camera, NDI, Zoom).
Starting & updating the relay
AntzMix always shows the relay's state in the footer, left of ● Stream:
| Footer shows | Meaning / what to do |
|---|---|
| ⬇ Get AntzMix Relay | Not set up on this PC yet – click it and follow the box in Settings → GENERAL. |
| ▶ Start AntzMix Relay ▾ | Installed but not running – click to start it. The first time, Chrome asks "Open AntzMix Service Relay?": tick Always allow and click Open. The icon appears next to the clock. |
| ● Relay | Running – Stream, Cam, NDI and the PC CPU figures are available. |
| ● Relay · update | A newer relay is available – Settings → GENERAL → Update to AntzMix Relay …, run the installer. |
- The footer buttons ● Stream and ● Cam are always clickable. If the relay is missing, stopped, too old or missing a part, a window shows what to do (the same window as for Advanced inputs). ● Cam turns on by itself when everything is ready. ● Stream never goes live by itself: when the relay is ready, the window closes and you click ● Stream again. In Settings, Enable NDI, Turn on AntzMix Camera and Show PC CPU usage stay greyed until the relay runs; the relay box next to them shows what to do.
- Start together with AntzMix Studio (Settings → GENERAL, relay box, on by default): the relay starts on your first click in AntzMix (browsers only allow starting programs after a click).
- When the relay is running, Check for updates compares it with the newest version on this site.
- ▾ next to the Relay button (footer, and next to Start AntzMix Relay in Settings): Start AntzMix Relay, Restart AntzMix Relay, Check for updates, Relay settings. Restart revives the relay when something stops working (a stream that won't start, NDI or the camera stuck). It warns first if streaming, AntzMix Camera, NDI or a Zoom call is on, because they pause for a few seconds. Settings → GENERAL also has a ↻ Restart AntzMix Relay button while it runs. Needs AntzMix Service Relay 1.11.
- If AntzMix Camera or NDI was on, it switches back on by itself when the relay starts.
Settings
Click Settings (or the format badge, e.g. 720p30 · 16:9). The sections are listed on the left: GENERAL, OUTPUTS (Video output, Virtual camera, NDI, Streaming, Recording) and SYSTEM (Audio, Performance). A small dot next to Virtual camera, NDI, Streaming or Recording shows it is running. AntzMix remembers your choices on this computer.
The AntzMix Relay box (on GENERAL, VIRTUAL CAMERA, NDI and STREAMING) checks the relay every time you open those pages: green = running, red = not running. Its gold Download AntzMix Relay for Windows button gets the installer; Check again re-tests after you start the relay.
GENERAL – what happens on a transition
These apply to Cut, Fade and Quick Play (not to overlays). All are off by default, so inputs keep their current state.
| Tick box | When ticked | When not ticked |
|---|---|---|
| Automix audio | An input's Audio turns on when it goes to Program and off when it leaves (unless it is still showing on an overlay layer). | Audio stays as it is. |
| Automatically play with transition | A paused video/playlist starts playing from where it is when it goes to Program. | Stays paused if paused. |
| Automatically restart with transition | The video/playlist item goes back to the start when it goes to Program. | Keeps its position. |
| Automatically pause after transition | The input pauses when it leaves Program (goes back to Preview). | Keeps playing if it was playing. |
| Show PC CPU usage | The status line shows CPU of the whole PC split into browser / relay / other (needs AntzMix Relay 1.4 running). | Only AntzMix's own share is shown. |
| Show PREVIEW / LIVE PROGRAM text | The words PREVIEW and ● LIVE PROGRAM show on the right of the blue Preview bar and the red Program bar (on by default). | Only the input names are shown on the bars. |
T-bar (two choices, see T-bar): Auto return Yes / No and Transition while half mix Auto Complete / Stay.
| Section | Setting | Notes |
|---|---|---|
| VIDEO OUTPUT | Output ratio | 16:9 (widescreen, default) or 4:3. |
| Output resolution | 720p (default, lighter) or 1080p. | |
| Frame rate | 25, 30 (default), 50 or 60 frames per second. | |
| VIRTUAL CAMERA | On/off, camera size | See AntzMix Camera. |
| NDI® OUTPUT | Enable, sources, size and rate | See NDI output. |
| STREAMING (RTMP) | Service, server, key, bitrate, encoding, relay | See Live streaming. |
| RECORDING | Folder, file type, video/audio quality | See Recording. |
| AUDIO | Main audio output | Where the final mix plays. |
| PERFORMANCE | Performance mode | Eco for older laptops, Balanced (default), Quality for strong PCs. |
| Stability test | See Performance. |
Keyboard shortcuts
Settings → SHORTCUTS lists the actions that have a key, with a search box (find an action or a key). + Add shortcut opens a list of every action in AntzMix, in groups, with its own search box: click an action, then press the key or key combination. Change gives an action another key, ✕ removes it, Reset all to defaults brings back the keys AntzMix starts with.
- Groups: Switching (Cut, Fade, Merge, Quick Play, FTB, T-bar, transition time −/+ 100 ms), Inputs, Overlays (1–4, all off), Audio (Master, Bus A B C, T-bar sound), Outputs (Stream, Record, AntzMix Camera, NDI® Program, Snapshot, Fullscreen output, Screen outputs), Studio Call (start, end, copy link), PlayList (next, previous, show / hide, Auto Next), Panels (STUDIO CALL / AUDIO MIXER tab, T-bar float / dock) and App (Help, Settings, New / Open / Save / Save as template).
- 1 … 9 = the input's number. One key family covers all nine inputs: for example Alt + 1 … 9 for "Input 1 … 9: sound on / off". Press any digit when you set it.
- Default keys: Enter Cut, Space Fade, M Merge, F FTB, 1 … 9 input to Preview, F1 Help, Ctrl+O / S / Shift+S templates.
- A key that is already used is refused with the name of its action; keys the browser keeps (such as Ctrl+W) are refused too.
- Shortcuts are saved on this computer. They do nothing while you type in a box or while a window is open (Help, Save and Open templates still work).
Performance & stability test
The status line (bottom right) shows the output format, FPS (frames drawn per second), render time, late frames, AntzMix RAM (memory used by AntzMix's own code – video frames and the browser use more; Task Manager shows the browser's total) and CPU. "idle" means nothing is changing on Program – AntzMix then saves power by not redrawing.
| CPU figure | Meaning |
|---|---|
| AntzMix ≈ x% | The mixer itself (this page's drawing work), as a share of the whole PC. Always shown. |
| CPU x% | The whole PC, like Task Manager. Needs Show PC CPU usage (Settings → GENERAL) and AntzMix Relay 1.4. |
| browser | All Chrome/Edge processes – all tabs, video decoding and the GPU process. Close other tabs to lower it. |
| relay | AntzMix Relay and FFmpeg (streaming, NDI). |
| other | Everything else on the PC (antivirus, Zoom, updates…). If this is high, close those programs before the event. |
Before an important event, test your computer:
- Set up your real show: camera on Program, logo and lower third on, playlist playing.
- Settings → PERFORMANCE → Stability test, choose 5 or 15 minutes, Run test.
- Result PASS = ready. NEEDS ATTENTION = try 720p, Eco mode, fewer inputs, or close other programs. Copy report to share it with your technical contact.
Troubleshooting
No sound
- Click once anywhere on AntzMix (browsers block sound until you click).
- Check the input's Audio is green and its fader and Master are up.
- Settings → AUDIO → check the Main audio output is the device you are listening to.
- Camera microphones start with Audio off – turn it on.
Camera is black or not listed
- Allow camera access (padlock icon left of the address bar → Camera → Allow).
- Close other programs that use the camera (Zoom, Teams, the Camera app).
- Unplug and re-plug a USB camera, then add it again.
A video won't play ("format not supported")
Use MP4 (H.264 video, AAC audio). Convert other formats with a free tool such as HandBrake.
"Relay not reachable" when testing or streaming
- Start AntzMix Service Relay from the desktop (icon next to the clock), or use ▾ → Restart AntzMix Relay in AntzMix.
- If Chrome asks to allow the site to connect to devices on your local network, click Allow.
- Not installed yet? See Installing AntzMix Relay.
Stream starts then ends straight away
- Check the stream key (copy it again from YouTube Studio / Facebook).
- On YouTube, the live stream must be set up in Studio first (Go Live → Stream).
- Look at the relay log (right-click the relay icon → Open log) – it shows the reason from FFmpeg.
Stream sound is crackly or "not clear", but fine on the PC
- Make sure the relay is version 1.3 or newer (Test relay shows the version). Older relays could let tiny gaps in the sound through, heard as crackles. Re-run the installer to update.
- Use audio bitrate 160 or 192 kbps.
- Judge quality from the Local copy or YouTube's own recording, not a phone recording or WhatsApp video – those compress the sound again.
- Hiss in the source (mixer desk, cable, input gain) gets worse after compression – keep the source clean and the level healthy.
Stream is choppy or "falling behind"
Choose a lower bitrate (2.5 Mbps), use 720p, use a wired network instead of Wi-Fi, and run the Stability test.
Picture stutters / CPU shows "serious" or "critical"
Switch to Eco mode or 720p, close other programs and browser tabs, plug in the charger.
The page still shows an old version after an update
Press Ctrl+F5. The version is shown next to the AntzMix name and in the browser tab.
AntzMix is not in the Google Meet / Zoom camera list
- Meetings list cameras, not NDI sources – use AntzMix Camera.
- Settings → VIRTUAL CAMERA: the relay box must say Camera ready. "AntzMix Camera NOT installed" = run Setup AntzMix Service Relay again with AntzMix Camera ticked (approve the administrator prompt).
- Close and reopen the browser / meeting app once after installing.
- The camera shows black or "not available" when ● Cam is off or the relay is closed – turn it on, then reselect the camera.
NDI: "NDI not available" or the source doesn't appear in vMix/OBS
- Run Setup AntzMix Service Relay again and tick NDI Runtime.
- Test relay should say NDI ready.
- Both PCs must be on the same network; allow the relay (Node.js) through Windows Firewall on Private networks when Windows asks.
- "dropped" in the NDI status means the PC can't keep up – turn off sources you don't need or use 720p.
Recording: "no folder chosen" or nothing saved
- Pick a normal folder such as Videos or Documents (Windows system folders and Desktop root may be refused by the browser).
- If the browser asks again for permission to the folder, click Allow (Chrome asks once per visit).
- Browsers without folder access (e.g. Firefox) download the file when you stop.
FAQ
Do I need to install anything?
No for mixing, recording, the big screen and Zoom/Teams screen-share – AntzMix runs in the browser. Live streaming, AntzMix Camera, NDI output and the PC CPU figures need the small AntzMix Relay (free, installed once); AntzMix Camera needs one administrator approval; NDI also needs the free NDI Runtime.
Are my files uploaded to the internet?
No. Videos and pictures you add stay on your computer; AntzMix plays them directly from your disk.
Does AntzMix remember my show when I reload the page?
Settings and layout are remembered. Inputs are not saved yet – a save/load show feature is planned.
Does AntzMix collect any data about me?
Only anonymous usage statistics, so the team knows how many people use AntzMix and which features work for them: once a minute, a random id made by your browser, the AntzMix version, the browser name (e.g. "Chrome 141 / Windows") and whether Stream, Cam, NDI or Rec is on. No names, IP addresses, files, pictures, sound or stream keys. Switch it off in Settings → GENERAL → Send anonymous usage statistics.
Can I use it on a phone or tablet?
A phone works great as a wireless camera for AntzMix. The mixer itself is designed for a laptop or desktop with Chrome or Edge.
Glossary
| Preview | The next shot, only you see it (blue). |
| Program | What goes out to the audience (red, LIVE PROGRAM). |
| Input | Any source: camera, video, picture, title. |
| Overlay | A layer shown on top of Program (logo, lower third). |
| Lower third | A name/title strip across the bottom of the picture. |
| FTB | Fade To Black. |
| RTMP | The standard way of sending a live stream to YouTube, Facebook etc. |
| Stream key | The secret code that links your stream to your channel. |
| Bitrate | How much data per second the stream uses – higher = better picture, needs faster internet. |
| Relay | The small AntzMix helper program on your PC that sends the live stream and NDI. |
| NDI® | A standard for sending live video between programs and PCs over a local network (by Vizrt). |
| Virtual camera | A "camera" made by software. AntzMix Camera shows the Program output to meeting apps as if it were a webcam. |
| Automix | Sound follows the picture: on when on air, off when off air. |
Change log
A short summary of every AntzMix Studio update, newest first. The full details of the latest update are in What's new. The version (for example rev35) is shown next to the logo in the app. “Relay” is the AntzMix Service Relay version that came with it.
- rev616 Nov 2026Relay 1.21New address: https://wemix.antzsolutions.com/
- NEWAntzMix Studio has a new home: wemix.antzsolutions.com. Settings stay in the browser per address, so on the new address you start fresh (template files open as before).
- IMPROVEDAntzMix Service Relay 1.21: works with the new address and takes its updates and add-ons from it.
- rev603 Nov 2026
- NEW+ Add shortcut (Settings → SHORTCUTS): give a key to any action in AntzMix – inputs 1–9 (sound, play / pause, restart, loop, ⚙), overlays, buses, outputs, Studio Call, PlayList, panels, templates.
- IMPROVEDSettings → SHORTCUTS lists only the actions that have a key, with a search box.
- rev59hf013 Nov 2026
- IMPROVEDSnapshot with the Polaroid effect saves two pictures: the plain one and the Polaroid (…_polaroid.png).
- NEWPolaroid branding: your own picture in the white strip under the photo (best size 1920×192 px).
- rev593 Nov 2026
- NEW📷 Snapshot: a full-size PNG of Program or Preview, saved in a folder you choose (or Downloads).
- NEWPolaroid effect on air: camera shutter, the photo zooms out to a tilted Polaroid, stays, and goes back to Live – with a shutter sound in Master.
- rev583 Nov 2026
- IMPROVEDStudio Call: a dropped connection repairs itself (new path on the same connection, then a fresh one); the guest keeps his input in the studio.
- FIXEDStudio Call: a guest who was connected and drops showed NEEDS RELAY – now reconnecting…; joining again no longer removes the guest's input.
- rev57hf023 Nov 2026
- IMPROVEDHow to unblock now opens a short guide with pictures (3 steps) instead of the long help page.
- rev57hf013 Nov 2026
- IMPROVEDThe code-signing notices (Add Input menu, relay box in Settings) now show how to unblock the installer to use the unsigned version, with a link to the steps.
- rev573 Nov 2026
- NEWScreen capture: Change screen / window… (right-click the tile or ⚙ → SCREEN) – another screen, window or tab in the same place, with the same settings.
- IMPROVEDScreen capture: the input stays when sharing stops (shows Sharing stopped); option to share the sound.
- IMPROVEDRelay install: new recommended Unblock step (right-click the zip → Properties → Unblock), so Windows does not stop Setup while the relay is not code-signed.
- rev56hf013 Nov 2026
- FIXEDGT title window inside Input Configuration (⚙): buttons and texts no longer overlap next to the left menu; the preview stays in view while you scroll the settings.
- rev563 Nov 2026
- NEWGT title window with a big live preview: every change shows at once, nothing goes on air until Save.
- NEWGT titles: text colour per field, date formulas such as {MMMM dd, yyyy} in many languages (TODAY = today's date), and change a picture (logo, photo).
- NEWGT titles: data source – a Google Sheet (live, with an offline copy) or an Excel / CSV file fills the title row by row; optional next row each time it goes on air.
- rev553 Nov 2026
- NEWAudio delay per input: ⚙ on each input strip in the Audio Mixer – 0 to −10,000 ms, the sound comes later to match the picture (lip sync). Master, buses and the recording all get it. Saved in templates.
- rev54hf013 Nov 2026
- FIXEDPlayList button is back in the bottom bar (it went missing in rev51): Off hides the PlayList and Studio Call / Audio Mixer expand downward; On brings it back. Remembered on this computer.
- rev543 Nov 2026
- NEWSettings → SHORTCUTS: set your own key for every action – Cut, Fade, Merge, Quick Play, FTB, T-bar, input 1–9 to Preview or to Program, next input tab, overlays 1–4, Master audio, Stream, Record, Help, templates. A key that is already used, or kept by the browser, is refused with the reason. Saved on this computer.
- rev532 Nov 2026
- NEWInput tabs above the input tiles: ALL plus your own tabs. + adds a tab; drag an input onto a tab, or use the right-click menu. One input can be in several tabs. Saved in templates.
- NEWRight-click menu on an input's picture: Add to tab, Send to output (Preview, Program, overlays, screen outputs, Studio Call guests, Master / buses / recording), Change input…, Duplicate, Settings, Minimize. Right-click on the name bar still minimizes / restores.
- NEWChange input… (menu and ⚙): add a new input in the place of this one – same number, tabs, layers, FrameSet slots and overlays.
- NEWDuplicate (menu and ⚙): a copy of the input with the same settings, right after it.
- IMPROVEDMouse wheel over a number field: up +1, down −1 (over a slider: one step).
- rev52hf0530 Oct 2026
- FIXEDAdd Input → Cameras: every camera button is as wide as its group, like the other buttons.
- rev52hf0430 Oct 2026
- IMPROVEDAdd Input → Advanced inputs: a red notice – advanced features may not work properly, or may be blocked by Windows, until our digital signature (code signing) application is complete.
- rev52hf0330 Oct 2026
- FIXEDAudio Mixer tab: no empty gap under the mixer – the PlayList starts right below it.
- rev52hf0230 Oct 2026
- FIXEDAudio Mixer: all strips in a row have the same height again (● REC was shorter) and their bottom labels line up.
- rev52hf0130 Oct 2026
- IMPROVEDAudio Mixer in two rows: OUTPUTS above (Master, buses, ● REC), INPUTS below. Shorter faders and meters, so the mixer leaves room for the PlayList.
- IMPROVEDT-bar: the ⧉ / ⇥ button moved to the bottom-left corner of the T-bar, opposite 🔊 – the middle column now starts level with Preview and Program.
- rev5230 Oct 2026
- NEWAudio buses: every input in the Audio Mixer has M A B C buttons – M sends it to Master, A, B, C to three extra mixes (buses) with their own fader and meter.
- NEWR per input: red = the input is in the recording, taken before its fader and before On/Off – so it is recorded even when it is not heard in Master. A ● REC strip shows the recording mix.
- NEWAudio outputs… (Audio Mixer): send Master or a bus to any audio device – for example a virtual audio cable for Zoom or Teams – and choose what the stream and NDI take.
- NEWScreen outputs (top bar): show Program, Preview or any input full screen on another screen. Clean = Program without the overlay layers.
- rev51hf0229 Oct 2026
- IMPROVEDStudio Call: Connection details now show the browser's own data word for word – connection states, every address pair tried with its check counters (sent / answered / received) and any error codes – for failed and working calls, so we can see how a phone gets through. A reading of the data follows, marked as such. A Copy button copies it all.
- rev51hf0129 Oct 2026
- IMPROVEDStudio Call: Connection details on the guest page and in the guest list – which address types each side offered and, when a call does not connect, the reason in plain words. NEEDS RELAY now shows only when the direct paths really failed (before: also while still waiting for an answer).
- FIXEDStudio Call: addresses that a computer finds late (slow networks, several network cards) are now passed on to the other side as well.
- rev5129 Oct 2026
- NEWSide panel: on the right, from top to bottom – STUDIO CALL and AUDIO MIXER as tabs above, the PlayList below. Studio Call always has its tab: one Start a call button, or the guest list during a call. Drag the edges to change the width and the split; AntzMix remembers them.
- NEWThemes (Settings → GENERAL → THEME): Console Graphite (the new default), Console Night, Console Keys, Linen and Active (the look up to rev50). The T-bar takes the theme's colours.
- IMPROVEDAdd Input shows where each input runs: Mac · Windows, or Windows for inputs that need AntzMix Service Relay.
- IMPROVEDT-bar: the “T-BAR” title is gone – only the float button stays.
- rev50hf0129 Oct 2026
- FIXEDStudio Call window: no longer cut off on smaller screens.
- NEWStudio Call panel: ⧉ Pop out opens the call manager in its own window (for example on a second screen); ⇥ Back to the panel or closing that window puts it back.
- rev5029 Oct 2026
- NEWStudio Call (Add Input → Online → Studio Call): call another AntzMix one to one (Single Call), or host a Studio Call – up to 4 guests join with a link, from AntzMix or from any phone or laptop browser, and you add each one as an input. Each side chooses what it sends (Program, Preview or an input); everyone hears everything except himself. Direct connection only; every guest is marked DIRECT or NEEDS RELAY.
- rev4929 Oct 2026
- IMPROVEDFrameSets: the frame (border, shadow, rounded corners) now belongs to the input in the slot – Position moves the input together with its frame and Zoom makes both bigger or smaller. The style is still set once per FrameSet, so all inputs in it look the same.
- NEWFrameSets: Merge method – Fade (as before) or Slide: inputs that leave slide off the screen at their nearest edge, new ones slide in.
- NEWInput tiles: drag a tile to another place – the inputs are numbered in the new order. Right-click a tile to minimize it to a slim bar (right-click again to restore).
- FIXED⚙ Input Configuration of a FrameSet: the window is now big enough – no overlapping buttons, no inner scroll bars.
- rev48hf0628 Oct 2026
- IMPROVEDMerge with FrameSets: each slot's frame (border and shadow) now moves with its content – no empty frames appear before the content arrives.
- rev48hf0528 Oct 2026
- IMPROVEDMerge: the input that is largest before or after the Merge now moves on top of the others; inputs it covers stay solid underneath instead of showing through while they fade.
- rev48hf0428 Oct 2026
- FIXEDFrameSets: during a Merge the FrameSet's background stays at full strength – it no longer fades through black.
- rev48hf0328 Oct 2026
- FIXEDDigital Bible: verse size, line spacing and line breaks now match the Digital Bible viewer exactly.
- rev48hf0228 Oct 2026
- FIXEDDigital Bible: the settings in ⚙ Input Configuration fit the window – no more scrolling sideways to see the preview.
- rev48hf0128 Oct 2026
- FIXEDDigital Bible: the background picture now shows even when the Digital Bible dashboard is open in the same browser. Added the backgrounds MICT 2025 and RECAP 01–03.
- rev4828 Oct 2026
- NEWDigital Bible input (Add Input → Texts → Digital Bible, MCGI tier): live verses from a Digital Bible Hybrid Edition 2026 operator or a Live Quad position (Q1–Q4), in the Digital Bible look – version, background (or transparent) and safe margin to choose; standby and BRB follow the operator.
- rev47hf0427 Oct 2026
- NEWFrameSets: 15 more layouts (22 in all, from 1 to 9 slots) – grids, a big slot with small ones around it, tall columns and more. The layout list now shows two per row, sorted by the number of slots.
- rev47hf0327 Oct 2026
- FIXEDFrameSets: Merge now glides an input from exactly how it looks in its slot (crop, fit, zoom, position, rounded corners) – no more jump back to its full picture at the start.
- rev47hf0227 Oct 2026
- IMPROVEDFrameSets slot settings: standard fit names Crop / Fit / Stretch; Zoom XY, Zoom X, Zoom Y; Position X / Position Y in pixels.
- rev47hf0127 Oct 2026
- NEWFrameSets: click a slot in the preview to set it up – fit mode, zoom and position – for that slot only.
- rev4727 Oct 2026
- NEWFrameSets input (Add Input → FrameSets): a background with framed slots and any of your inputs in each slot. 7 layouts, preset or own background, frame style (rounded corners, border, shadow). Merge between two FrameSets glides the inputs they share into their new slots.
- rev46hf0427 Oct 2026
- IMPROVEDT-bar: the speaker button 🔊 now sits at the bottom of the Master meter, like the On / Off button under each fader in the Audio Mixer.
- rev46hf0327 Oct 2026
- IMPROVEDT-bar column as wide as the transition buttons. The Master audio meter now runs the full height beside it, with a speaker button 🔊 to mute Master audio (same as Master On / Off in the Audio Mixer).
- rev46hf0227 Oct 2026
- FIXEDT-bar: holding the mouse at the top after a complete mix no longer swaps Preview and Live again and again (flicker). Let go of the mouse to start the next mix.
- rev46hf0126 Oct 2026
- NEWT-bar: double-click completes the mix, Shift + double-click takes it back. Settings → GENERAL → T-bar: Auto return (Yes / No – with No the bar stays like a hardware T-bar and LIVE / PREVIEW swap ends) and Transition while half mix (Auto Complete / Stay).
- IMPROVED⧉ Float takes the whole middle column (transition buttons, overlay buttons, T-bar); Preview and Live then sit side by side. Overlay buttons 1–4 now have the same height as the T-bar buttons; the "Overlay layers" label is gone.
- rev4626 Oct 2026
- NEWT-bar in the middle column: drag up to mix Preview into Live by hand (let go half-way to keep both), with the Master audio meter beside it and 4 buttons you assign with a right-click (Cut, Fade, overlays, Stream, Record, Master audio, an input to Preview …). Dock it or float it anywhere.
- rev4526 Oct 2026
- NEWInput Configuration (⚙ on every input): one window with all settings of the input and a new PICTURE tab – opacity, size (keep the aspect ratio or not), position, crop, rotate and flip. Also for cameras, images, NDI®, screen and stream inputs.
- IMPROVEDThe input's own settings – text, colour, website, play options, phone camera, Zoom Manager – are now tabs in the same window.
- rev44hf0126 Oct 2026Relay 1.20
- FIXEDWebsite URL: a page that loads now starts paused with its sound off – no sound slips out on load (before, a short sound could be heard).
- NEWWebsite URL: while ⌨ is on, you can also click directly on the Preview or Program monitor that shows the page (gold frame).
- rev4426 Oct 2026Relay 1.19
- NEWWebsite URL: when the page has a video, ▶ on the tile and the timecode, seekbar and restart on the monitor control it like a video file. The site's own controls still work.
- NEWWebsite URL: at the end the video stops on its last frame – the site does not go on to its next video.
- IMPROVEDWebsite URL: ⌨ Interact never pauses or plays the video by itself, and the page is shown as the site made it (its own controls are no longer hidden).
- rev43hf0225 Oct 2026Relay 1.18Relay update.
- IMPROVEDRelay Setup now does every install step itself, in its own window – no hidden PowerShell script any more. Windows Defender had stopped the previous Setup because of that script.
- rev43hf0125 Oct 2026Relay 1.17Relay update.
- IMPROVEDSetup downloads the Zoom and Website add-ons from our server as before; if that would take more than 5 minutes from your location, it switches to a faster download server (Cloudflare) by itself.
- rev4325 Oct 2026Relay 1.16
- NEWWebsite URL input: any web page as an input, with its sound – scoreboards, tickers, countdowns, lyrics, YouTube videos. ⌨ on the tile lets you click and type in the page; the status bar shows where your keyboard goes until you press Release (Esc).
- NEWVideo sites: show the video full screen (ticked by itself for YouTube): the page's video fills the input. If it is not full screen yet, it goes full screen in Preview first and then goes live.
- NEWAntzMix Service Relay 1.16 with the optional Website add-on (about 180 MB, downloaded once). Add Input → Website URL installs it with one click.
- rev42.0125 Oct 2026Help page only.
- IMPROVEDWhat's new is now at the top of the help page and first in its menu.
- rev4225 Oct 2026
- NEWStart-up window: while AntzMix loads, a window shows the logo, what's new and a status bar with each loading step. Nothing can be clicked until everything is ready.
- NEWWhen loading is done the same window offers Open a template: the last open template first, then recent ones, Open a file… and Start new. Press Esc or click outside it to start as before.
- rev4125 Oct 2026No visible change.
- IMPROVEDPrepared for other languages: every text on the screen – including messages, windows and tooltips the program makes – can now be translated with a standard gettext (.po) file. No other language is included yet.
- rev40.0124 Oct 2026Relay 1.15Relay update (and a small fix in the page).
- IMPROVEDRelay Setup and the tray icon's Check for updates now download with their own Windows program instead of a hidden PowerShell. Some antivirus programs (for example Kaspersky) stopped Setup because of the old way. Downloads stay as fast as before (8 pieces at a time).
- IMPROVEDWindows' administrator prompt for AntzMix Camera now names Setup AntzMix Service Relay instead of Windows PowerShell.
- FIXEDInstalled relays can find updates again with the rebuilt page of rev39.
- rev3923 Oct 2026No visible change.
- IMPROVEDRebuilt inside: the app is now three files (page, look, program code), each with all its settings, colours and texts in one place at the top.
- IMPROVEDPrepared for translations in the standard gettext (.po) format.
- rev38.0323 Oct 2026
- FIXEDAdding an input no longer removes both starter inputs: from a starter tile it takes that tile's place only; from the top button nothing is removed.
- rev38.0223 Oct 2026
- NEWMaster On/Off in the Audio Mixer: Off silences everything that leaves AntzMix (output, stream, recording, NDI, Zoom); inputs keep their own On/Off.
- rev38.0123 Oct 2026
- NEW⚙ on video and playlist tiles: this input's own auto play, Automix audio, restart and pause – or Same as Settings. Saved in templates.
- rev3723 Oct 2026
- NEWTemplates (
.antzmix): save the whole board – inputs, layers, overlays, Preview / Program – and open it again later. - NEWMedia files are found again in a folder you choose; missing ones become red tiles with Locate….
- NEWSave with media: one file with the template and all its videos and pictures.
- NEWOptional: restore the last state when AntzMix opens (off by default).
- NEWTemplates (
- rev3623 Oct 2026
- IMPROVEDThe footer buttons ● Stream and ● Cam are always clickable. If something is missing, a window explains what to do. ● Stream never goes live by itself.
- IMPROVEDThe Add Input menu always opens under the gold ADD INPUT button at the top, also when opened from an input tile.
- FIXEDPassword fields (Zoom passcode and host key, stream keys) were almost unreadable – now dark like the other fields.
- rev3523 Oct 2026
- NEWAdd Input menu in two parts: Standard inputs (work in the browser) and Advanced inputs (need AntzMix Service Relay).
- IMPROVEDAdvanced inputs are always clickable. If the relay is missing, stopped or too old, a window shows what to do and opens your input by itself when it is ready.
- IMPROVEDA clear explanation of the Windows “Windows protected your PC” message when installing the relay.
- IMPROVEDThe menu uses the screen height first, then adds columns.
- IMPROVEDHelp: this change log, and a full “What's new” for the latest version.
- FIXEDThe Add Input menu no longer closes by itself on the first click when the relay starts together with AntzMix.
- REMOVEDThe YouTube (video only) input, because it does not follow YouTube's rules. Public YouTube videos will come back with the Website URL input.
- rev3316 Oct 2026Relay 1.13Relay Setup only.
- FIXEDSetup no longer stops at “Start AntzMix Service Relay now?” when it was installed from a downloaded zip file.
- rev3216 Oct 2026Relay 1.13Relay Setup only.
- FIXEDAfter the update from WebMix, the old “WebMix Service Relay” entry is now removed from Windows Settings → Apps.
- rev3116 Oct 2026Relay 1.13
- NEWNew name: AntzMix Studio, with a new icon on the page, browser tab, tray and Setup.
- NEWPREVIEW and ● LIVE PROGRAM labels on the monitors (Settings → GENERAL to hide them).
- IMPROVEDPreview bars are now blue and Program bars red, like most broadcast tools.
- IMPROVEDGold ADD INPUT ▾ button.
- IMPROVEDThe relay is now called AntzMix Service Relay. Updating moves your settings, Zoom add-on and recordings to the new folder by itself.
- rev3015 Oct 2026
- NEWStarter inputs: the app opens with colour bars and a blue colour, so you see at once where pictures appear. Your first real input replaces them.
- IMPROVEDStatus bar shows the memory AntzMix itself uses (“AntzMix RAM”).
- IMPROVEDRelay Setup downloads big files in small pieces, so slow connections no longer stall at the end.
- rev2915 Oct 2026Relay 1.12
- NEWAdd Input menu in groups, with every camera and capture card listed by name.
- NEWAudio file and Audio input device inputs.
- IMPROVEDRenamed: Quick Prompt (was Title / Verse), Basic lower third, GT Titles.
- IMPROVEDZoom: the tile shows why a meeting ended (for example the 40-minute limit of a free plan).
- FIXEDZoom: leaving and joining again right away no longer fails.
- rev2815 Oct 2026Relay 1.11
- IMPROVEDRelay Setup downloads the Zoom add-on in 8 parallel pieces and continues a broken piece where it stopped.
- FIXEDWrong characters (“·”) in the Setup progress line.
- rev2715 Oct 2026Relay 1.11
- IMPROVEDRelay Setup shows live progress (MB, speed, time left), so long steps no longer look stuck.
- IMPROVEDThe Zoom add-on is not downloaded again when it has not changed.
- rev2615 Oct 2026Relay 1.11
- NEWThe relay installs in a normal Windows window and runs in the background with an icon next to the clock (Restart, Stop, Check for updates, Start with Windows).
- NEWColour input: pick any colour, a transparent blank, or HD colour bars.
- IMPROVEDA watchdog restarts the relay if it stops.
- rev2515 Oct 2026
- FIXEDLayers, titles and overlays could flicker on the Program monitor.
- rev2415 Oct 2026
- NEWMerge transition and layers (picture-in-picture boxes on any input).
- NEWvMix GT titles (.gtzip) with their In and Out animations and editable text.
- rev2314 Oct 2026Relay 1.10
- IMPROVEDZoom call works end to end in real meetings. The add-on installs with the relay Setup.
- rev2214 Oct 2026Relay 1.9
- NEWZoom call input: join a meeting, take each participant as an input, and send Program back into the meeting with mix-minus sound.
- FIXEDThe phone camera ⚙ button works again.
- rev2114 Oct 2026
- NEWPhone camera: full screen, “On top” buttons, and the camera recovers by itself after a call.
- rev2013 Oct 2026
- NEWPhone camera: any iPhone or Android phone joins as a wireless camera by QR code, with a tally light. No app needed.
- rev1913 Oct 2026Relay 1.8
- NEWNDI® source input with sound and transparency.
- rev1810 Oct 2026
- NEWAnonymous usage statistics, with an opt-out in Settings → GENERAL.
- rev1710 Oct 2026Relay 1.7
- NEWRTMP / SRT stream source input.
- NEWStream to up to 3 destinations at once.
- rev1610 Oct 2026Relay 1.6
- NEWRelay status in the footer, with a Start button and update check.
- rev1510 Oct 2026Relay 1.5
- NEWVirtual camera: use Program as a webcam in Meet, Zoom, Teams and OBS.
- rev1410 Oct 2026
- IMPROVEDLarger Settings window in two columns, with the relay status on each page.
- rev1310 Oct 2026Relay 1.4
- NEW● Rec: record Program with the final sound.
- NEWNDI® output of Program, Preview and inputs.
- NEWAutomix audio and automatic play / pause on transitions.
- rev1210 Oct 2026Relay 1.3
- IMPROVEDClearer stream sound, choice of audio quality, and a local copy of the stream.
- rev1110 Oct 2026
- NEWThis help page (Help button or F1).
- rev1010 Oct 2026Relay 1.2
- IMPROVEDThe relay installs in its own AntzHive folder.
- rev0910 Oct 2026Relay 1.1
- NEWRelay installer for Windows.
- rev0810 Oct 2026Relay 1.0
- NEWLive streaming (RTMP) with the ● Stream button.
- rev0710 Oct 2026
- IMPROVEDPlayList: tick boxes, double-click to play, drag and drop.
- rev0610 Oct 2026
- IMPROVEDMonitors keep the exact output shape.
- rev0510 Oct 2026
- NEWSettings for output shape (16:9 or 4:3), resolution and frame rate.
- rev0410 Oct 2026
- NEWDock column for PlayList and Audio Mixer.
- rev032 Oct 2026First public test.
- NEWvMix-style layout: Preview / Program, Cut / Fade, 4 overlay layers, playlists, audio output choice, stability test.